
Back to tutorials page
Tutorial TB_Servo1
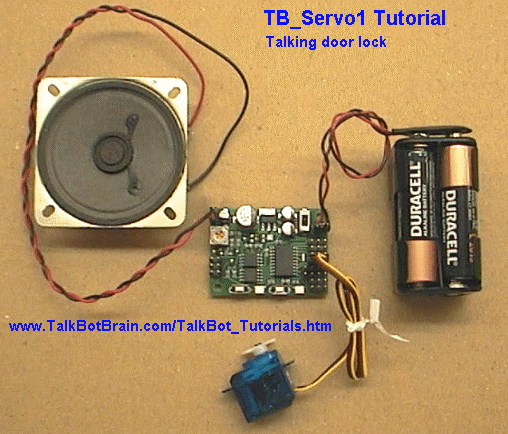
TB_Servo1 uses modified PIC firmware to drive one RC servo and play sounds. It is an example of a talking door lock. When the button is pressed it toggles the servo position between left/right and also speaks a message "door is locked/door is un-locked".
Step 1; Load the sounds into TalkBot
TB_Servo1.SL
TB_Servo1.BTL (Alg1.5 fine21)
These are the sound library files you need, download them onto your PC. Then connect the serial cable and a battery to the TalkBot. Download the .BTL file from your PC into the TalkBot as usual, if you are unsure how to do this see the tutorial.
Assuming your TalkBot has the standard firmware installed you can press button2 to play each sound, and button1 to return to the first sound as usual. There are only 2 sounds in this project.
Step 2; Program the PIC firmware
TB_Servo1.hex
This is the .HEX file of the firmware to program into the PIC 16F628 in the TalkBot. Download this file onto your PC. (Note! Full source code is provided at the bottom of this page)
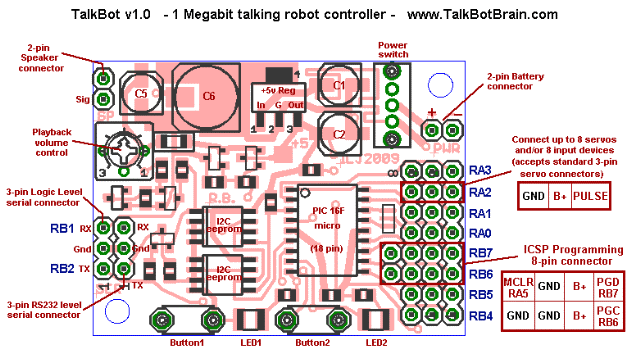
Connect a PIC programmer to the TalkBot using the 8-pin (4x2) ICSP connector as shown in the diagram below;
Program the .HEX file into the PIC as you normally do. This can vary slightly depending on which programmer you use. If you need to manually set the PIC config fuses these should be set to;
_BODEN_OFF
_PWRTE_ON
_WDT_OFF
_LVP_OFF
_MCLRE_OFF
_HS_OSC
Once the new firmware has been programmed, pressing Button2 will alternately play sound0 and sound1, even with no servo connected.
Step 3; Prepare the TalkBot hardware for the servo
Turn the TalkBot over and check that the 2 solder jumpers are set as shown in the diagram, this connects the middle 8 pins to +B (battery) instead of +5v. This is required because the RC servo will plug into the pins and the servo needs battery power, not +5v power.
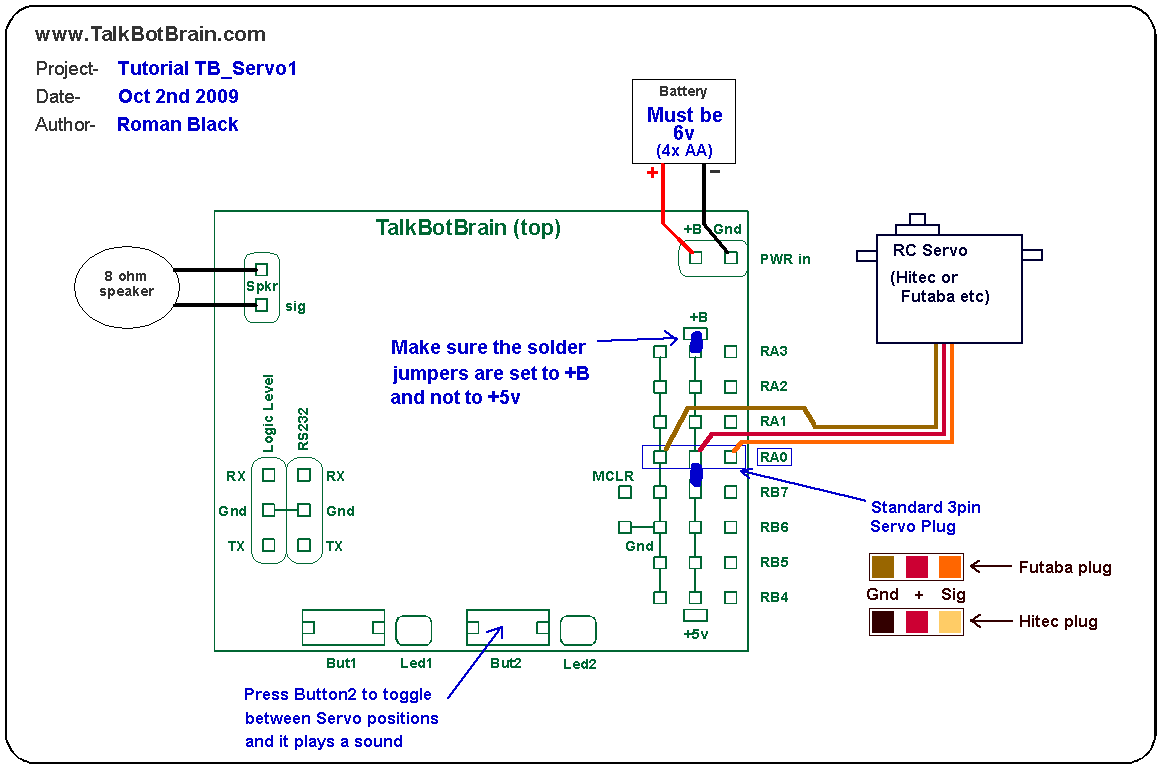
Make sure the TalkBot has a 6v battery as this is the right voltage to power the Servo. Then connect the speaker as usual. Finally plug in the Servo, to the RA0 row of pins. Check the diagram above carefully to make sure it is plugged in correctly.
Step 4; Using it
Switch the TalkBot ON. The TalkBot should make its normal beep and flash, then the Servo should move to the left position. If there is a problem then turn the power off and re-check all connections. If that does not solve the problem, unplug the Servo completely and check that the TalkBot alternately plays both sounds, toggling everytime Button2 is pressed. If not, then go back to Step2 and program the PIC firmware again.
If everything is working the Servo will toggle positions from left/right everytime Button2 is pressed. Also, a sound will be played; "door is locked" or "door is un-locked".
The source code
(This section is for people who are familiar with PICs and C source code). This Tutorial to drive one RC servo was based on the standard Slave1 firmware with just a few simple modifications to the Slave1 source code;
1. A global variable servo_toggle was added;
// vars used only for TB_Servo1 firmware
unsigned char servo_toggle;	// to toggle servo position
2. A function servo_move() was added;
//=============================================================================
//  SERVO MOVE
//=============================================================================
void servo_move(unsigned char servo, unsigned int period)
{
   	//-------------------------------------------------
	// used in TB_Servo1 tutorial firmware.
	// this function tells a servo (0-7) to move to position
	// set by servo pulse length (a period of 1000uS-2000uS
	// for most standard servos)
	//
	// The interupt moves servos automatically, all this function
	// does is put the period values in the MSB and LSB for the
	// 16bit servo pulse-hi period. The interrupt requires that
	// the 16bit period be in 0.2uS resolution, so the orig
	// period in uS must be multiplied by 5.
	// Also, the value must be inverted to (0-period) as
	// it is directly used to generate a period using TMR1.
   	//-------------------------------------------------
	// auto shut down that servo if period==0
	if(!period)
	{
		sv8_pulselength_msb[servo] = 0;		// servo is now OFF
	}
	else  // else move the servo
	{
		// force safe limits for servo pulse lengths!
		if(period > 2200) period = 2200;
		if(period < 800) period = 800;

		// convert period from uS to 0.2uS resolution (period*5)
		// use special *5 math because it compiles smaller
		period = ((period << 2) + period);

		// convert period to (0-period) and put in MSB and LSB
		period = (0 - period);
		sv8_pulselength_msb[servo] = (period / 256); 	// get MSB
		sv8_pulselength_lsb[servo] = (period & 0x00FF); // get LSB
	}
}
//-----------------------------------------------------------------------------
3. Some setup code was added in main();
   	//-------------------------------------------------
	// for TB_Servo1 firmware only; Move servo0 to full left,
	// and turn the TMR1 int on (enables servos).

	servo_move(0,1000);		// move servo0 to 1000uS (=1mS, is full left)
	servo_toggle = 0;		//

	// and turn servo interrupt on
	INTCON = 0b11000000;		// global ints on, TMR1 (PEIE) on

   	//-------------------------------------------------
4. Some code was put in main() to test if Button2 was pressed, and if so, toggle the servo position and play a sound;
	// if BUT2 was quick pressed, move servo and play a sound!
	if(t0_count > 4)	// 4 gives small BUT2 debounce
	{
		// this is for TB_Servo1 firmware, each time the
		// button BUT2 is pressed is toggles the servo position
		// and plays a sound.
		if(!servo_toggle.F0)
		{
			servo_move(0,2000);	// move servo0 to 2000uS (full right)
			play_btc_lib_sound(1);	// and play sound1 twice
			play_btc_lib_sound(1);
		}
		else
		{
			servo_move(0,1000);	// move servo0 to 1000uS (full left)
			play_btc_lib_sound(0);	// and play sound0 twice
			play_btc_lib_sound(0);
		}
		servo_toggle++;
	}
	t0_count = 0;	// reset BUT2 debounce count
The whole project is contained in this .ZIP file. It contains the sound library, firmware, HEX file, C source code etc. TB_Servo1.ZIP (98 kb)
Page last updated; Oct 19th 2009 - Copyright 2009 - www.TalkBotBrain.com
Back to tutorials page